#21Q3) Waves and Optics
Location of the images formed by concave lens by the method of no-parallax and hence determination of the focal length of the lens
Required Apparatus
A concave lens mounted on a stand, 2 optical pins, a plane mirror strip, a metre ruler, and a background screen.
Scientific Theory
For a concave lens, if is the object distance, is the image distance and is the focal length, according to the common formula,
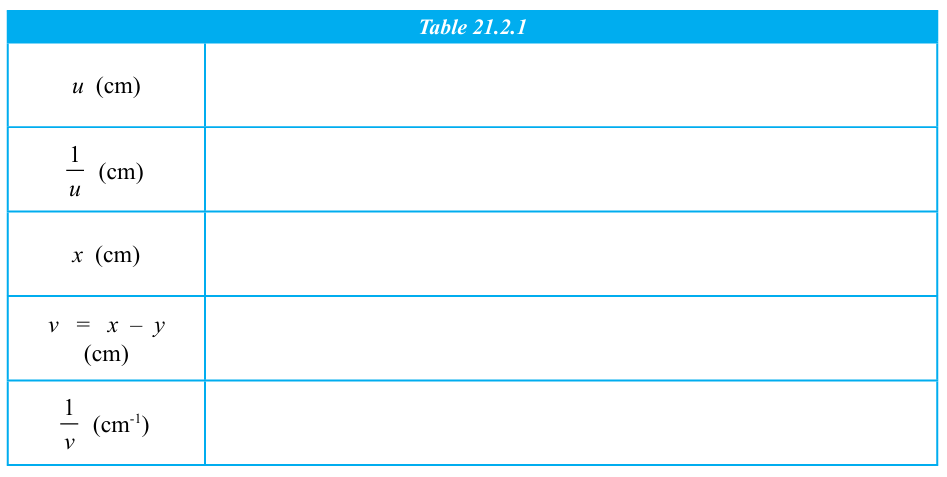
Applying the sign convention (new cartesian) and ploting againt the graph would give an intercept .
The value of can be hence calculated.
Experimental Method
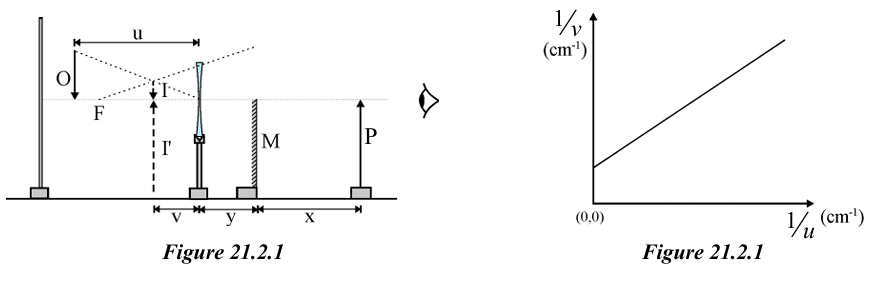
- Draw a straight line on the table using chalk and towards the middle of the line place the stand carrying the lens normally to the line so that the plane of the lens too is normal to the line.
- On one side of the lens place a pin mounted on a stand so that the tip of the pin lies on the principal axis of the lens as shown in the Figure 21.2.1.
- Place the background screen at a distance from that pin which is considered as the object (O).
- Now place the eye above the line on the table and on the side opposite to that where the object is and observe whether the upright diminished image and the object are seen in line along the central region of the lens. If not adjust the lens with the stand by rotating it slightly (until the plane of the lens is normal to the principal axis) to bring the image to the optical axis of the lens.
- Now place the plane mirror strip (M) as shown in the figure on the side opposite to that of the object and below the principal axis of the lens covering one half of the lens.
- Next fix the second optical pin on a stand and place it on the line drawn on the table so that the tip of the pin touches the principal axis of the lens.
- Place the eye as shown in the figure and vary the distance between the mirror and the pin P until the tip of the small upright image I seen through the lens is seen to coincide with the tip of the image I' formed behind the mirror.
- Measure the object distance , the distance between the lens and the mirror and the distance between the mirror and the pin P, . (Note: ).
- Vary arbitrarily keeping the value of constant and measure the distance for five more situations of coincidence.
- Plot against . Calculate the focal length of the lens from the intercept of the graph using the theory. (Find the gradient of the graph (), obtain coordinates , of a suitable point on the graph. Substituting the values of , and in the equation and calculate ).
Important Points
1
- Conclude the value obtained from the above calculations as the focal length of the lens.
2
- Discuss the courses of action to be taken to minimise errors and find the focal length of the lens more accurately.
3
- Read the note on the experiment 21.1. Those suggestions can be used to select the values of .
4
- Since images can be obtained between the optical centre and the focus for all positions of real objects, select the values of to spread widely.